Using Fades
Programmatic fades have the advantage that you will not see any compression artefacts as the image fades to or from one colour. Prepare your video files without fades, and add them in Liquid Cinema to create the best results.
In this section you will learn how to:
Fade Affected
Fade Events generally only affect the main video branch in your timeline, unless you specifically set it to affect other events such as Graphics and Text. On each Event Editing Panel, use the AFFECTED BY FADE EVENTS toggle to enable or disable the fade effect to that particular event.
Create a Fade in or Fade Out
- Set your In and Out Points on the Timeline.
- Click
 next to
  to the left of the Timeline
 - A new Event (colour block) will appear on the Timeline
- The FADE Editor will appear in the Preview Window
- Enter a Name (optional)
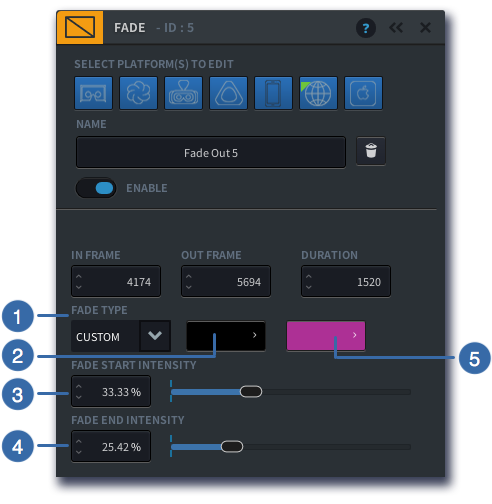
- Choose the FADE TYPE: Fade In, Fade Out or Custom. A Fade In will always create a fade in from 100% black, to fully transparent. A Fade Out will create a fade from fully transparent to 100% black colour. Choose Custom when you want to change the start or end intensity, or change the start or end colour of the fade. (see section below)

Make it a habit to close an Event Editing Panel once you are finished by pressing C or clicking “X” on the panel. This way you will avoid accidentally changing the IN and OUT points of your fade when authoring a new event right after.
Create a Custom Fade
Follow steps 1 – 5 as above to create a new Fade Event
- From the FADE TYPE choose CUSTOM
- You can now set the start colour
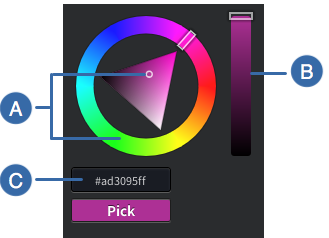
- Set the START COLOUR of your fade by clicking on the left colour panel. A COLOUR PICKER will pop up. Select a colour using the colour wheel (A), the transparency by setting the transparency slider (B) or enter a manual colour code (C). Hit PICK when done.
- Set the FADE START INTENSITY by adjusting the slider from zero (fully transparent) to 100% (fully opaque).
- Choose the FADE END INTENSITY by adjusting the slider from zero (fully transparent) to 100% (fully opaque)
- Set the END COLOUR in the same manner as you set the start colour.
- hit the ‘c’ key to close the editing panel, or close by hitting the ‘x’
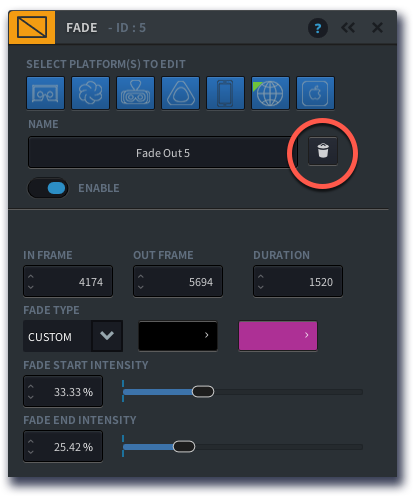
Delete a FADE Event
- Double Click on the Event on the Timeline or from the Event List panel
- The FADE Editor will appear
- Click on

- A confirmation appears – select “Delete” to permanently delete that Event, or “Keep” to cancel the request
![]() Once deleted, the panel will close and the Event will disappear from both the Timeline and the Event list.
Once deleted, the panel will close and the Event will disappear from both the Timeline and the Event list.