TEXT Editor
 The Text Editor lets you:
- add a Text that will be live-rendered upon playback
- configure the layout of your Text
- place your Text in a 2-dimensional or 3-dimensional space
- add a Background to your Text
- make your Text interactive by assigning an Action to it
-
-
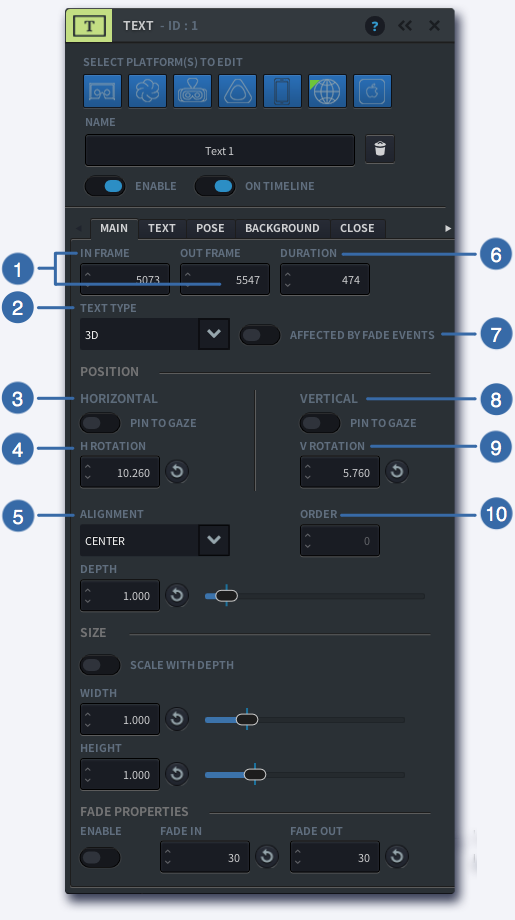
1
IN / OUT FRAME
Specify the IN frame in which this Event should start and the OUT frame in which the event should end by entering a number (>0)
-
2
TEXT TYPE
Select how the text should be laid out in the physical space. Use 3D to place the text into a 3D space, or 2D to lay the text in a planar space
-
3
HORIZONTAL PIN TO GAZE
For 3D type graphics only: this allow the text to appear in the direction the user is looking, regardless of where they were looking before. Horizontal Pin to Gaze positions the text on the horizontal plane where the user is looking.
-
4
HORIZONTAL ROTATION
For 3D type text only: specify the placement of the text along the horizontal coordinates of the 360 sphere
-
5
ALIGNMENT
Select the alignment method of the text: Centre, Left, Right, Bottom, Middle and Top.
-
6
DURATION
Enter the duration (frames) of this Event. This is represented by the coloured bar on the Timeline
-
7
AFFECTED BY FADE EVENTS
Indicate whether you want your text to be affected by fade events in the timeline. If checked, the text will fade with the overall picture. If unchecked, everything except the text will fade.
-
8
VERTICAL PIN TO GAZE
For 3D type graphics only. This allow the text to appear in the direction the user is looking, regardless of where they were looking before. Vertical Pin to Gaze positions the text on the vertical axis where the user is looking.
-
9
VERTICAL ROTATION
For 3D-type text only: specify the placement of the text along the vertical coordinates of the 360 sphere
-
10
ORDER
For 2D type Text: when using multiple text events on the same planar field, you can set the order of text to show which one needs to appear on top of the other. Lower numbers reflect text that appears more in front
-
-
-
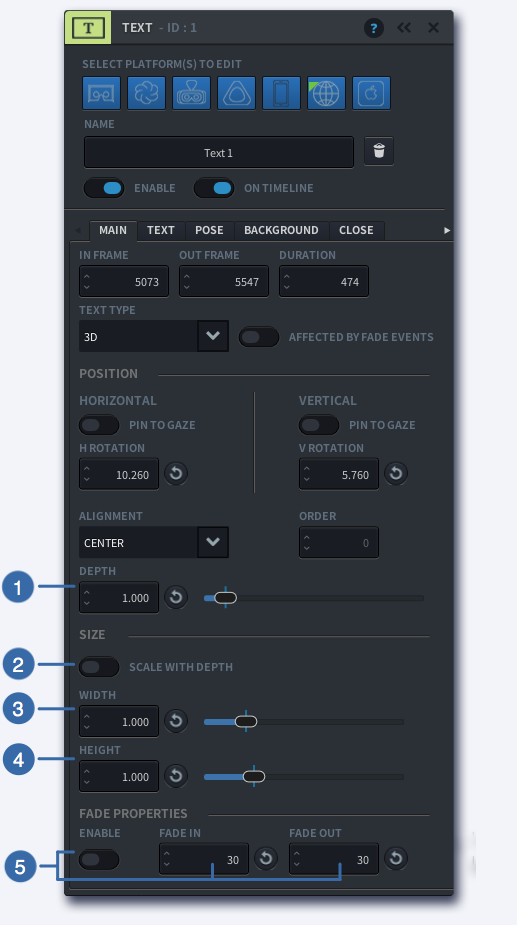
1
DEPTH
For 3D type text only: specify the depth within the three dimensional space. A larger value means the text will appear further away from the viewer.
-
2
SCALE WITH DEPTH
When turned on, your text will be scaled to appear the same size when adjusting the depth positioning. When turned off, your graphic will appear larger when positioned closer, and smaller when positioned further away.
-
3
WIDTH
Use Width to change the size of your text. Changing the Width will automatically also changed the height, as aspect ratio is locked.
-
4
HEIGHT
Use Height to change the aspect ratio of your text. As the aspect ratio is not locked, changing the height will not change the width.
-
5
FADE IN / OUT
Use the toggle button to enable or disable a Fade function on your text. Use the fields to the right of the toggle to enter the duration of your Fade In and Fade Out respectively
-
-
-
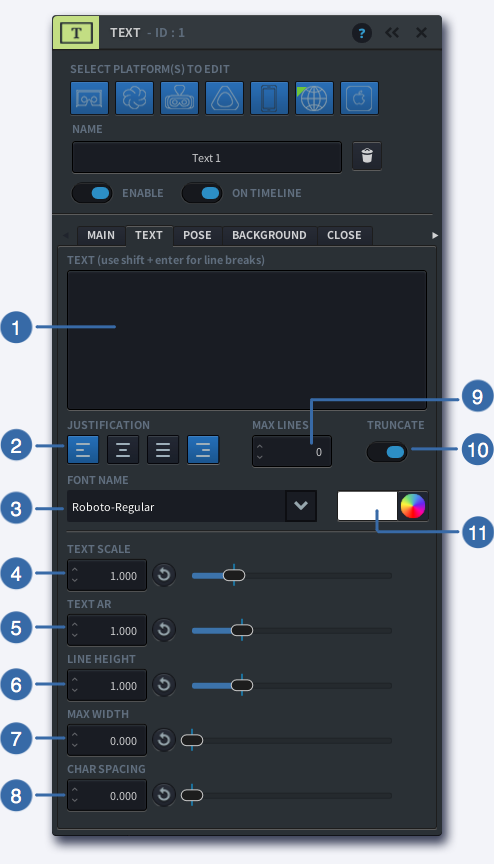
1
TEXT FIELD
Type in your text in this field. Press ENTER to submit your text, and use SHIFT +ENTER to create a line break
-
2
JUSTIFICATION
Choose the alignment of your text: left, centered, justified or right
-
3
FONT NAME
Choose your font from the drop down menu
-
4
TEXT SCALE
Change the size of your text by entering a number or adjusting the slider
-
5
TEXT AR
Change the vertical scale of your text by entering a number or adjusting the slider
-
6
LINE HEIGHT
Adjust the the line spacing by entering a number or adjusting the slider
-
7
MAXIMUM WIDTH
Set the maximum width for your text field by entering a number or adjusting the slider
-
8
CHARACTER SPACING
Adjust the character spacing of your text by entering a number or adjusting the slider
-
9
MAXIMUM LINES
Set the maximum number of lines to display. When the value is zero, there is no maximum number of lines
-
10
TRUNCATE
-
11
TEXT COLOUR
Use the colour picker to choose a colour for your text
-
-
-
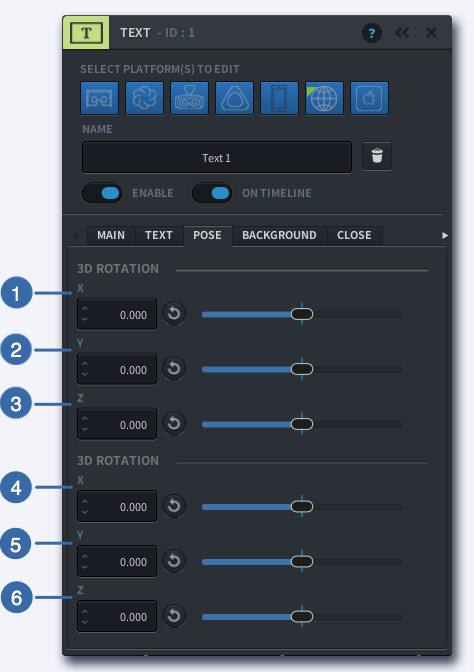
1
POSE X
Rotate the text around its centre along the horizontal axis by entering a number (-180<180) or adjusting the slider
-
2
POSE Y
Rotate the text around its centre along the vertical axis by entering a number (-180<180) or adjusting the slider
-
3
POSE Z
Rotate the text around its centre along the Z-axis by entering a number (-180<180) or adjusting the slider
-
4
TRANSLATION X
Move the text along the horizontal axis by adjusting the slider
-
5
TRANSLATION Y
Move the text along the vertical axis by adjusting the slider
-
6
TRANSLATION Z
Move the text along the Z-axis by adjusting the slider
-
-
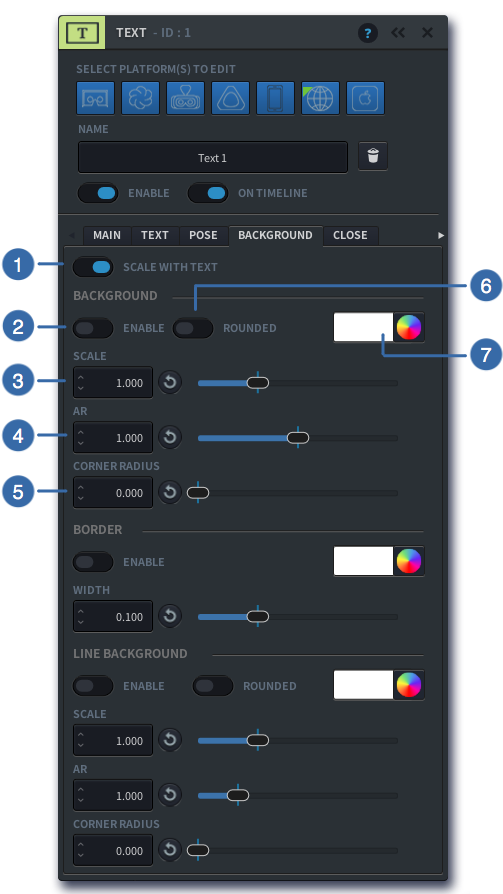
-
1
SCALE WITH TEXT
Turn on the toggle to scale the background with the text
-
2
ENABLE BACKGROUND
When enabled, your text will have a background colour. Use the colour picker (7) to choose a background colour
-
3
BACKGROUND SCALE
Change the size of your background by entering a number or adjusting the slider
-
4
BACKGROUND AR
Change the vertical scale of your background by entering a number or adjusting the slider
-
5
CORNER RADIUS
Create rounded edges to your background by adding a corner radius
-
6
BACKGROUND ROUNDED
When enabled, your background’s round edges will show (if corner radius >0)
-
7
BACKGROUND COLOUR
Use the colour picker to choose a colour for the background
-
-
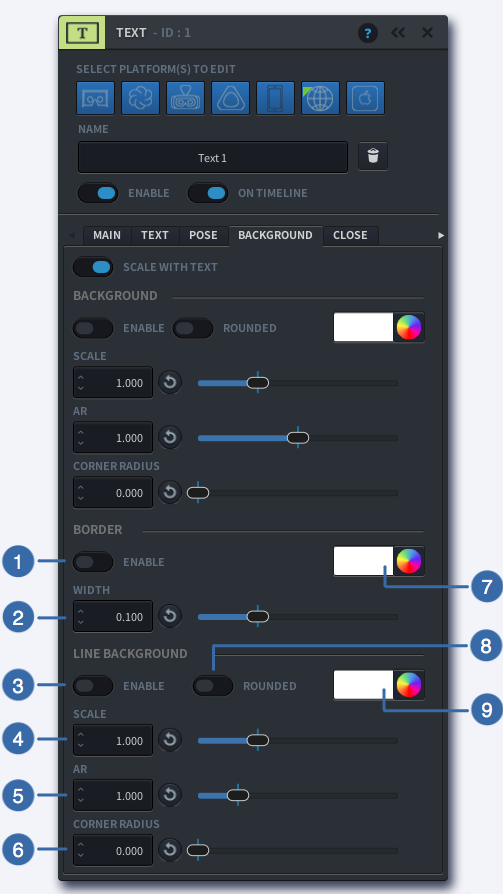
-
1
ENABLE
Use this toggle to turn the background border on or off
-
2
WIDTH
Adjust the width of the border by entering a value 0<.5 or by adjusting the slider
-
3
LINE BACKGROUND
When enabled, the text will be highlighted with the colour chosen from the colour palette (9)
-
4
SCALE
Adjust the horizontal scale of the highlighted area
-
5
AR
Adjust the vertical scale of the highlighted area
-
6
CORNER RADIUS
Add a corner to the text highlight
-
7
BORDER COLOUR
Use the colour picker to choose a colour for the border
-
8
ROUNDED
Enable the rounded button to add rounded corners to your highlight
-
9
LINE COLOUR
Use the colour picker to choose a colour for the highlight
-
-
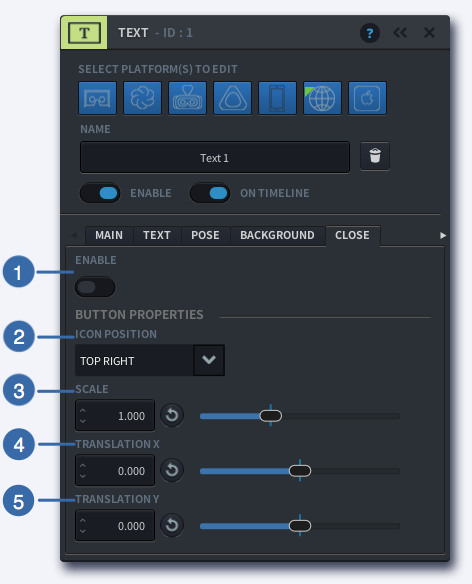
-
1
ENABLE
When switched on, a close button will appear on your text
-
2
ICON POSITION
Indicate where you would like the Close button to appear: Top Right, Top Left, Bottom Right or Bottom Left
-
3
SCALE
Resize the Close button by entering a number or adjusting the slider
-
4
TRANSLATION X
Use this function to offset the Close button horizontally
-
5
TRANSLATION Y
Use this function to offset the Close button vertically
-
-
Order and Depth
When using 3D-type text, and you have multiple texts that are overlapping each other, you may use the DEPTH function to place one text in front of the other. Similarly, for 2D-type text, you can use the ORDER function to indicate which text appears in front, and which text towards the back.