PIP Editor
![]() The Picture in Picture (PIP) Editor lets you:
The Picture in Picture (PIP) Editor lets you:
- Display a second video within your main video branch
- Attribute interactive features to your PIP video
-
-
1
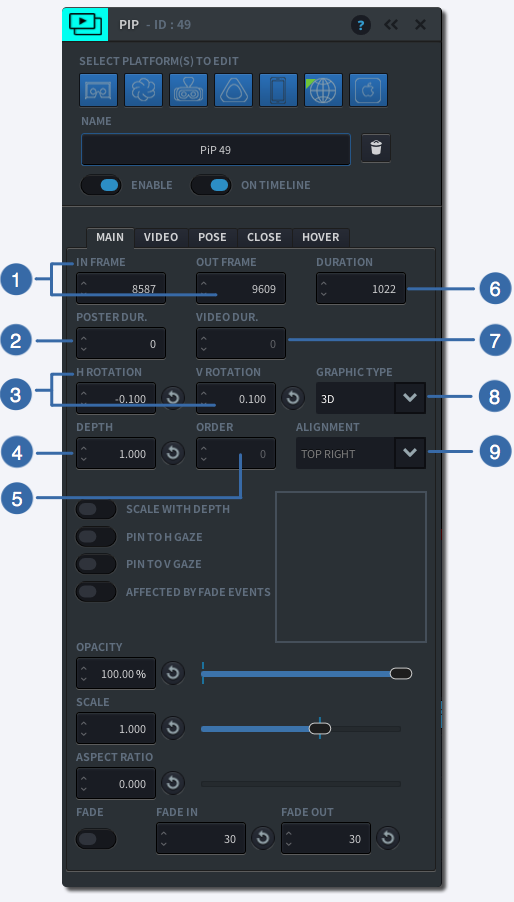
IN/OUT FRAME
Specify the IN frame at which the Event should start and the OUT frame in which the Event should end by entering a number (>0)
-
2
POSTER DURATION
Specify how long the video’s poster (thumbnail) image should stay visible. This also determines the latest time by when your PIP video Event can be played back.
-
3
HORIZONTAL/VERTICAL ROTATION
Specify the Horizontal and Vertical Rotation of the Picture in Picture Video.
-
4
DEPTH
For 3D Type PIPs only: specify the depth within the three dimensional space. A larger value means the PIP will appear further away from the viewer.
-
5
ORDER
For 2D Type PIPs only: specify the layer order if using more than one Graphic in one place.
-
6
DURATION
Enter the Duration (or frames) of the Event.
-
7
VIDEO DURATION
Video Duration displays the length of the video associated with this PIP Event. This happens automatically upon linking the video asset on the Video Tab.
-
8
GRAPHIC TYPE
Select how the PIP (poster image + video) should be laid out in the physical space. Choose either 3D or 2D.
-
9
ALIGNMENT
For 2D PIPs only: specify how to align the PIP within the viewing window:
– Centre
– Top Left
– Top Centre
– Top Right
– Middle Left
– Middle Right
– Bottom Left
– Bottom Centre
– Bottom Right
-
-
-
1
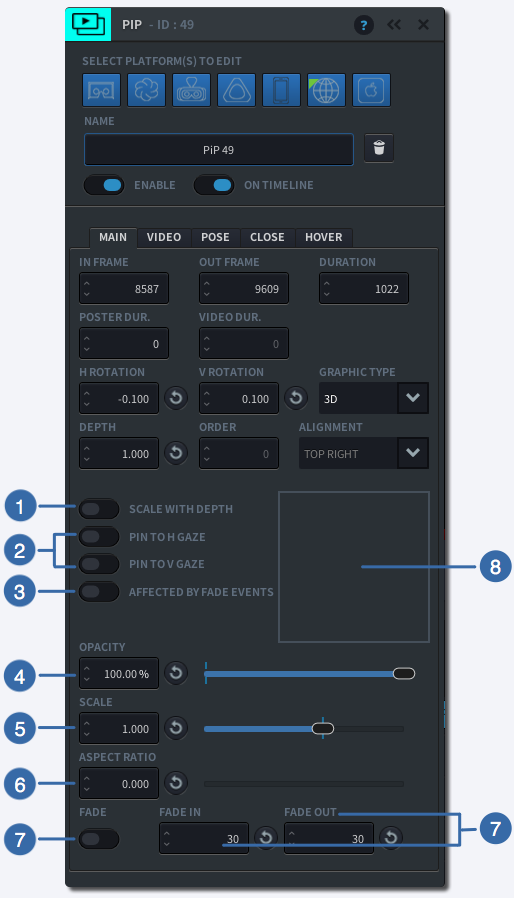
SCALE WITH DEPTH
When turned on, your PIP will be scaled to appear the same size when adjusting the depth positioning. When turned off, your PIP will appear larger when positioned closer, and smaller when positioned further away.
-
2
PIN TO GAZE
For 3D type PIPS only: this setting allows the PIP to appear in the direction where the user is looking. Horizontal Pin to Gaze positions the PIP on the horizontal plane where the user is looking. Vertical Pin to Gaze positions the PIP along the vertical plane where the user is looking. When both Horizontal and Vertical are switched on, the PIP will appear right in front of the user’s gaze, regardless of where they were looking before.
-
3
AFFECTED BY FADE EVENTS
When switched on, the PIP will be affected by any fade events that are present in the Timeline.
-
4
OPACITY
Here you can set the opacity of the PIP which include both the poster image and video.
-
5
SCALE
Adjust the size of your PIP by entering a value between 0-2 or adjusting the slider
-
6
ASPECT RATIO
Adjust the Aspect Ratio of your PIP by entering a number between 0-30 or adjusting the slider
-
7
FADE IN/OUT
Use the toggle button to enable or disable a Fade function on your PIP. Use the fields to the right of the toggle to enter the duration of your Fade In and Fade Out respectively
-
8
POSTER IMAGE
To select a poster image for your PIP video, click on the grey square. The Poster Image is a graphic associated with your PIP that is visible until your PIP video starts to play
-
-
-
1
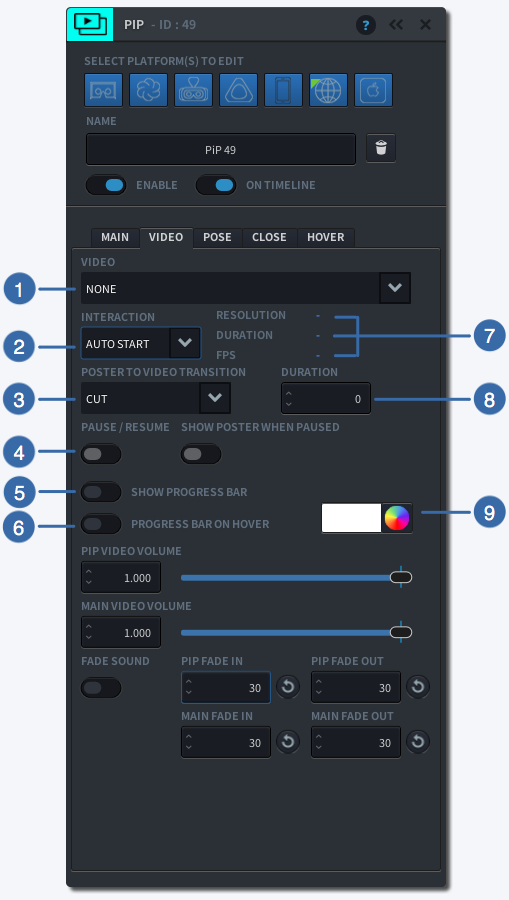
VIDEO
Select the video from the drop down list
-
2
INTERACTION
Choose when the PIP video should start to play based on the user’s interaction: Auto Start, Click to Start, Gaze to Start, Play on Hover
-
3
POSTER TO VIDEO TRANSITION
Indicate how the Poster image should transition to the PIP video: via a Cut, Dip to Black, or Dissolve
-
4
ENABLE PAUSE / RESUME
When enabled, the user is able to pause and resume the video by clicking on it. When enabling ‘Show Poster when Paused’, the Poster image will show as long as the video is paused.
-
5
SHOW PROGRESS BAR
If enabled, the PIP video will have a progress bar at the bottom which shows at any time how much the user has watched of the total video
-
6
PROGRESS ON HOVER
When enabled, the PIP video shows the progress bar, only if the user hovers over the PIP
-
7
RESOLUTION / DURATION / FPS
Here you find details of your video including its Resolution, Duration and the number of frames per second (FPS). These values cannot be changed.
-
8
DURATION
This field indicates the duration of the transition from the Poster image to the PIP video
-
9
PROGRESS BAR COLOUR
Using a colour picker, you can choose the colour of the progress bar to indicate your PIP video’s progress upon playback.
-
-
-
1
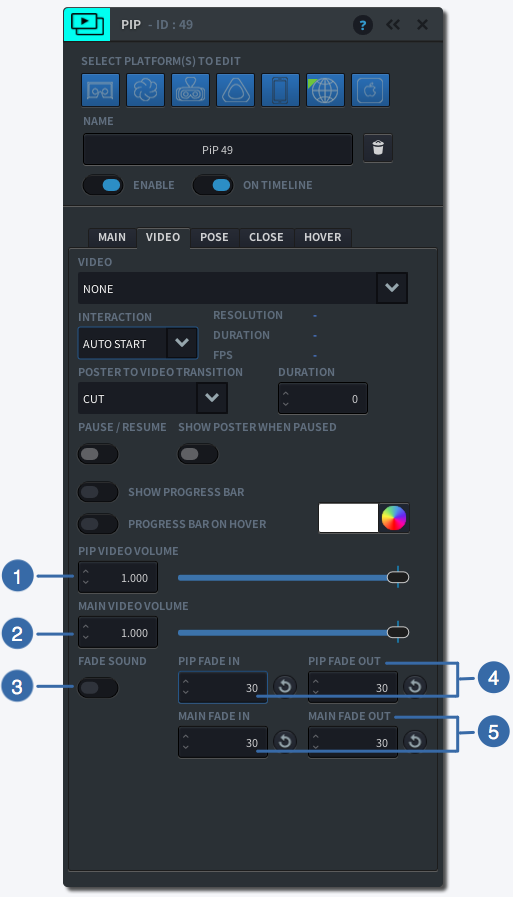
PIP VIDEO VOLUME
Adjust the volume of the sound on your PIP video by entering a number 0<1 or by using the slider
-
2
MAIN VIDEO VOLUME
Adjust the volume of the audio from the main video branch while your PIP video is playing.
-
3
FADE SOUND
Add an audio fade transition to make a smooth transition from the main video branch to the PIP video. While the PIP audio fades in, the main video audio fades to the audio level as indicated above (Main Video Volume)
-
4
PIP FADE IN / OUT
Adjust the duration in frames over which your PIP’s audio fades in and out.
-
5
MAIN FADE IN / OUT
Adjust the duration in frames over which your Main video’s audio fades out and in.
-
-
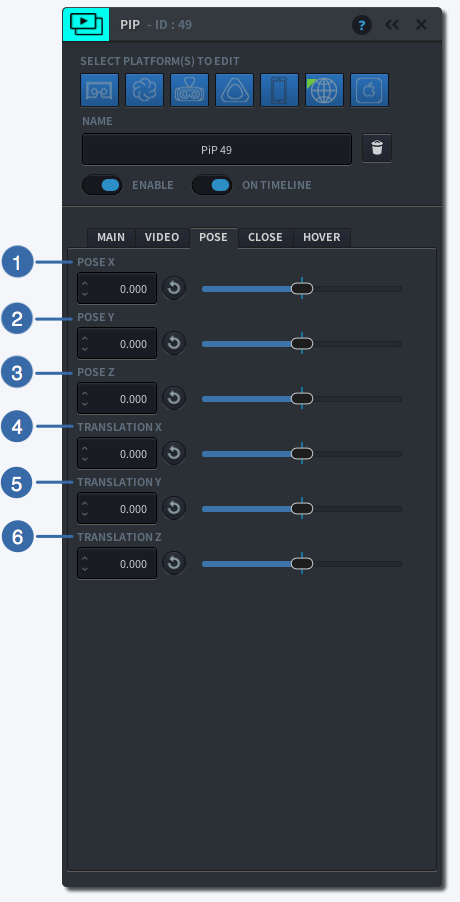
-
1
POSE X
Rotate the PIP around the centre of its shape along the horizontal axis by entering a number (-180<180) or moving the slider
-
2
POSE Y
Rotate the PIP around the centre of its shape along the vertical axis by entering a number (-180<180) or moving the slider
-
3
POSE Z
Rotate the PIP around the centre of its shape along the Z-axis by entering a number (-180<180) or moving the slider
-
4
TRANSLATION X
Move the PIP along the horizontal axis by adjusting the slider
-
5
TRANSLATION Y
Move the PIP along the vertical axis by adjusting the slider
-
6
TRANSLATION Z
Move the PIP along the Z-axis by adjusting the slider
-
-
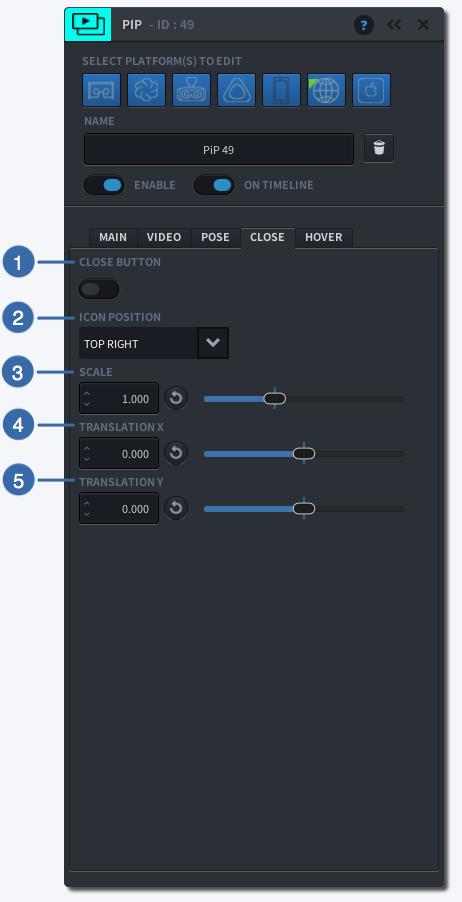
-
1
SHOW CLOSE BUTTON
Indicate whether you want your PIP to show a Close button
-
2
ICON POSITION
Indicate where on the PIP you would like the Close button to appear: Top Right, Top Left, Bottom Right or Bottom Left
-
3
SCALE
Resize the Close button by adjusting the slider
-
4
TRANSLATION X
Use this function to offset the Close button horizontally
-
5
TRANSLATION Y
Use this function to offset the Close button vertically
-
-
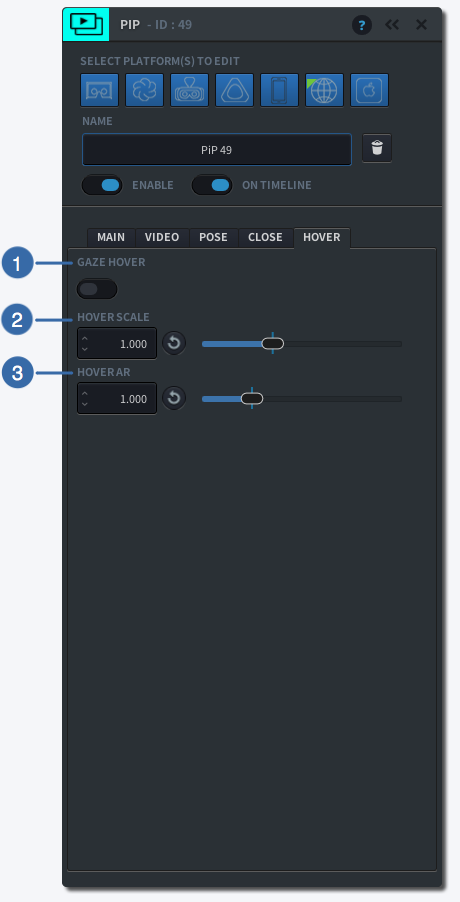
-
1
GAZE HOVER
Switch on to enable the Hover function. When enabled, the PIP will resize when you hover over it with your mouse, or gaze at it in VR
-
2
HOVER SCALE
Set the Hover Scale to change the size of your graphic in hover state
-
3
HOVER AR
Use the slider to change the Aspect Ratio of your graphic in hover state
-