GRAPHIC Editor
 The Graphic Event Editor lets you:
include a graphical asset within your spherical video, animate graphics and make your graphic interactive by assigning an Action Event to it.
-
-
1
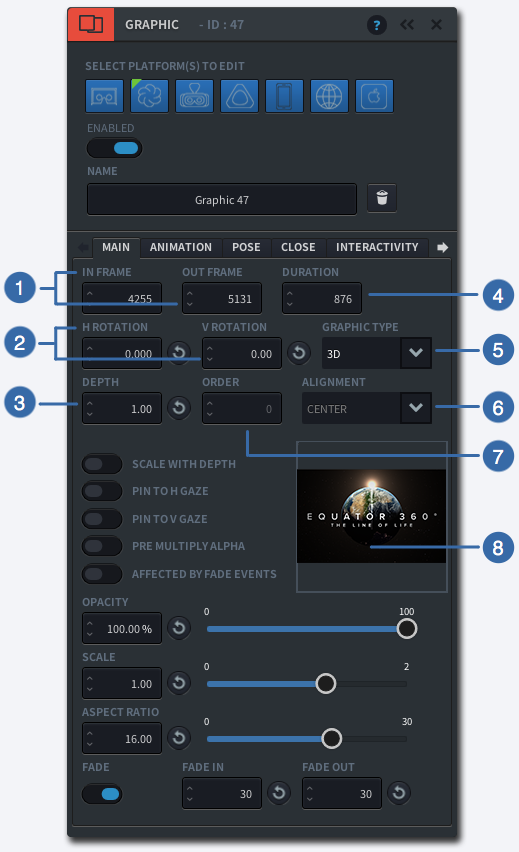
IN/OUT FRAME
Specify the IN frame in which this Event should start and the OUT frame in which the Event should end by entering a number (>0).
-
2
HORIZONTAL/VERTICAL ROTATION
Specify the Horizontal and Vertical Rotation of the graphic
-
3
DEPTH
For 3D graphics only: specify the depth within the three dimensional space. A larger value means the object will appear further away from the viewer
-
4
DURATION
Enter the duration (frames) of this Event, or enter an Out Frame number
-
5
GRAPHIC TYPE
Select how the graphic should be laid out in the physical space. Use 3D to place graphics into a 3D space, or use 2D to lay a graphic out in a 2D space.
-
6
ALIGNMENT
For 2D graphics only: specify how to align the graphic within the viewing window:
– Centre
– Top Left
– Top Centre
– Top Right
– Middle Left
– Middle Right
– Bottom Left
– Bottom Centre
– Bottom Right -
7
ORDER
For 2D graphics only: specify the layer order if using more than one graphic in one place
-
8
THUMBNAIL
Click on the square to load or change a graphic asset
-
-
-
1
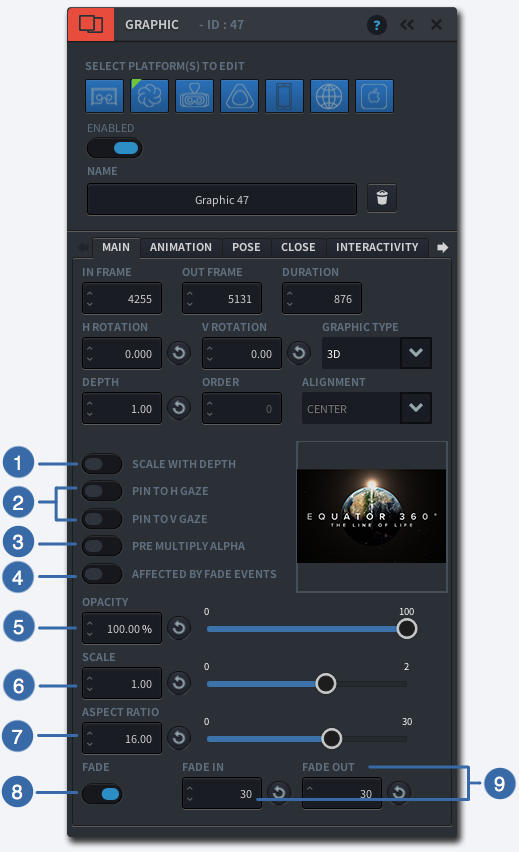
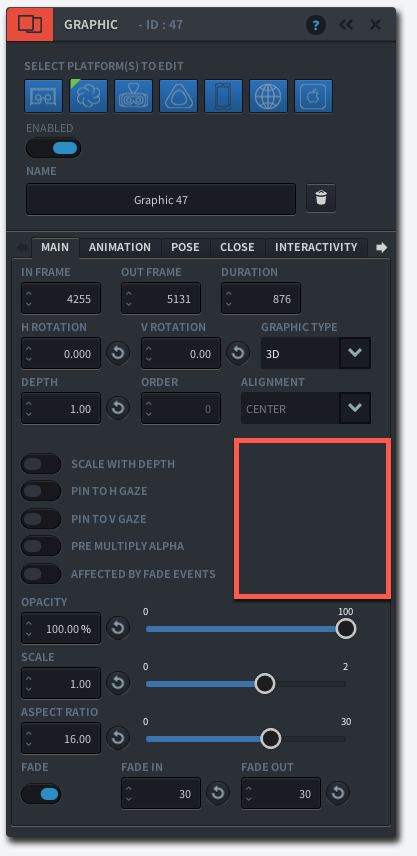
SCALE WITH DEPTH
When turned on, your graphic will be scaled to appear the same size when adjusting the depth positioning. When turned off, your graphic will appear larger when positioned closer, and smaller when positioned further away.
-
2
PIN TO GAZE
For 3D graphic types only: This setting allows the graphic to appear in the direction the user is looking. Horizontal Pin to Gaze positions the graphic on the horizontal plane where the user is looking, Vertical Pin to Gaze positions the graphic along the Vertical axis where the user is looking. When both Horizontal and Vertical are switched on, the graphic will appear right in front of the user’s gaze, regardless of where they were looking before.
-
3
PRE MULTIPLY ALPHA
-
4
AFFECTED BY FADE EVENTS
Indicate whether you want your graphic to be affected by fade events in your timeline or not. If checked the overlay will fade with the overall picture. If unchecked everything except the overlay will fade away.
-
5
OPACITY
Adjust the opacity level by moving the slider (highest number means most opaque)
-
6
SCALE
Adjust the scale by moving the slider (highest number means largest)
-
7
ASPECT RATIO
Adjust the aspect ratio by moving the slider.
-
8
FADE
When turned on, your graphic will have a fade in and fade out effect.
-
9
FADE IN/OUT
Specify the duration of the Fade In and Fade Out effects by entering a number (>0)
-
-
-
1
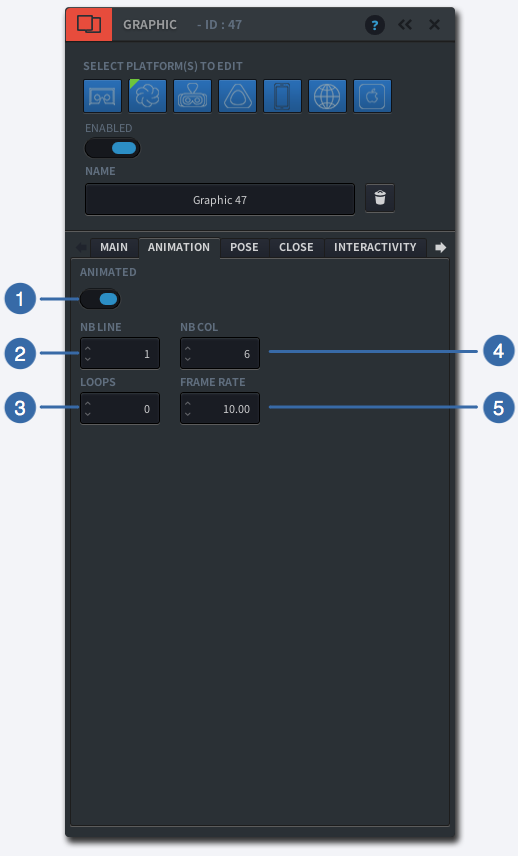
ANIMATED
Switch on to enable the Animation function
-
2
NUMBER OF LINES
Enter the number of rows that your sprite sheet uses
-
3
LOOPS
Indicate how many times your animation should loop
-
4
NUMBER OF COLUMNS
Enter the number of columns that your sprite sheet uses
-
5
FRAME RATE
Enter the frame rate of your animation
-
-
-
1
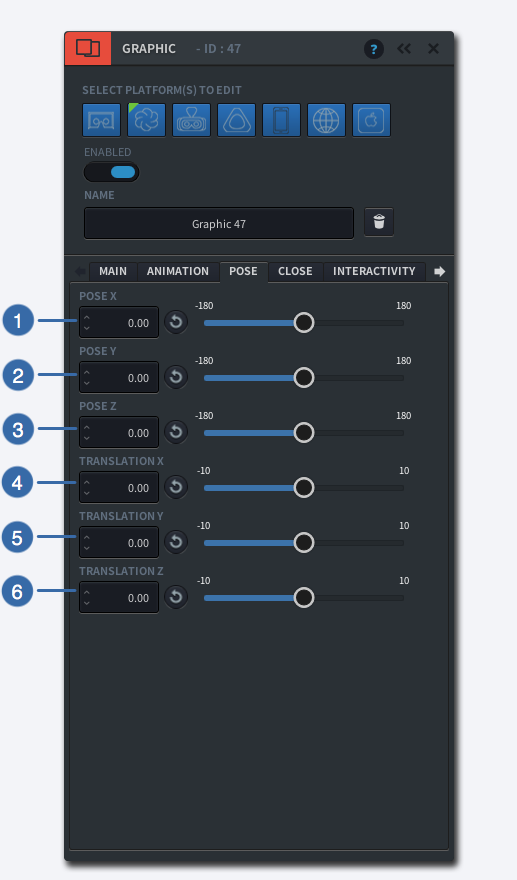
POSE X
Rotate a graphic around the center of its shape along the horizontal axis by entering a number (-180<180) or moving the slider
-
2
POSE Y
Rotate a graphic around the center of its shape along the vertical axis by entering a number (-180<180) or moving the slider
-
3
POSE Z
Rotate a graphic around the center of its shape along the Z-axis by entering a number (-180<180) or moving the slider
-
4
TRANSLATION X
Move the graphic along the horizontal axis by adjusting the slider
-
5
TRANSLATION Y
Move the graphic along the vertical axis by adjusting the slider
-
6
TRANSLATION Z
Move the graphic along the Z-axis by adjusting the slider
-
-
-
1
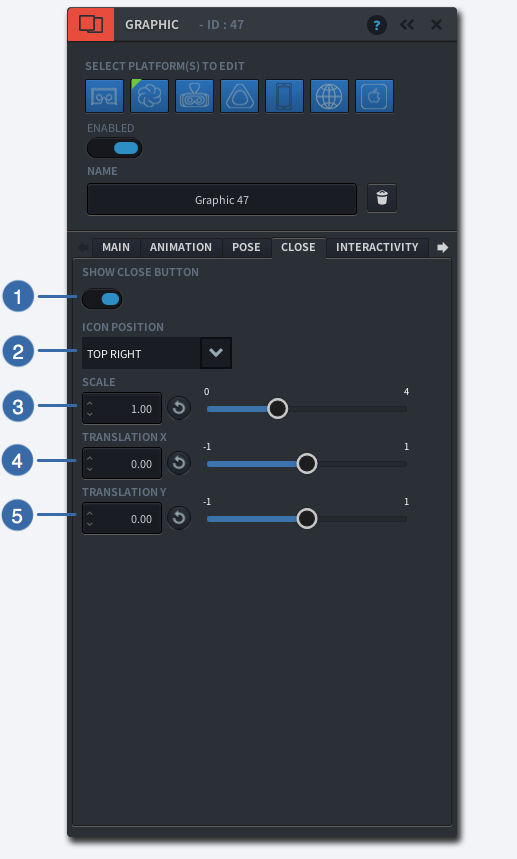
SHOW CLOSE BUTTON
Indicate whether you want your graphic to show a Close button
-
2
ICON POSITION
Indicate where on the graphic you would like the Close button to appear: Top Right, Top Left, Bottom Right or Bottom Left
-
3
SCALE
Resize the Close button by adjusting the slider
-
4
TRANSLATION X
Use this function to offset the Close button horizontally
-
5
TRANSLATION Y
Use this function to offset the Close button vertically
-
-
-
1
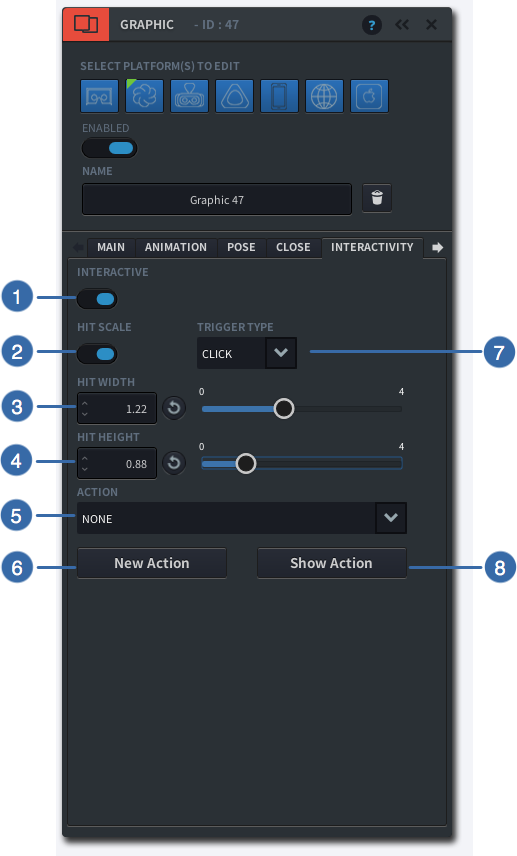
INTERACTIVE
Switch on to enable interactive behaviour of your graphic
-
2
HIT SCALE
Switch on to enable modifying your hit box’ scale
-
3
HIT WIDTH
Adjust the width of your hitbox area by moving the slider
-
4
HIT HEIGHT
Adjust the height of your hitbox area by moving the slider
-
5
ACTION
Specify what type of interaction you want to trigger. Once you have created a New Action, you can select the action using this drop down.
-
6
NEW ACTION
Click on ‘New Action’ to create the action that you want the hitbox to trigger. The Action Event Panel will pop up. Read more about Creating Action Events.
-
7
TRIGGER TYPE
Specify which user interaction should trigger the action to take place: click or gaze
-
-
-
1
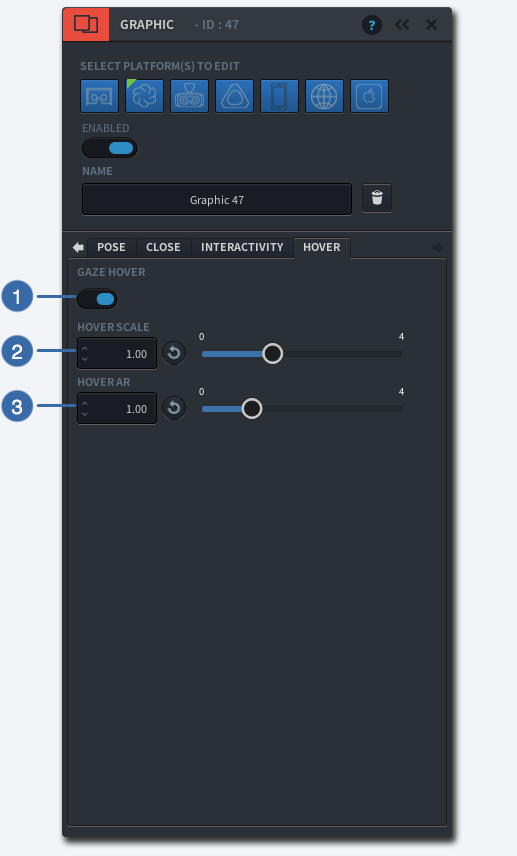
GAZE HOVER
Switch on to enable the Hover function. When enabled, the graphic will resize when you hover over it with your mouse, or gaze at it in VR.
-
2
HOVER SCALE
Set the Hover Scale to change the size of your graphic in hover state
-
3
HOVER AR
Use the slider to change the Aspect Ratio of your graphic in hover state
-
Learn how to:
Video Tutorial
Please note, the video tutorials were creatd with an older version of Liquid Cinema, and may have outdated interface elements.
Add a new Graphic Event
- Set an IN and OUT point in the timeline.
- Click on
 next to
  the left of the Timeline
 - A new Event
 will appear on the Timeline
 - The GRAPHIC EVENT EDITOR will appear
Import a Graphic asset
- Drag and drop JPEG or PNG files on the PREVIEW WINDOW.
- The authoring tool will ask if you wish to copy the files into the Assets folder of your project. Click on YES.
- On the GRAPHIC EVENT EDITOR, click on the empty thumbnail square
- The SOURCE IMAGE WINDOW now let’s you browse all images accessible to the project. Hover over the image to see its dimensions. Click the image to select it.
- The selected image can now be seen as a thumbnail on the Main tab of the GRAPHIC EDITOR At the same time the image appears in the PREVIEW WINDOW of the Authoring Tool for further manipulation.
Importing Multiple Images
Drag multiple image files onto the Preview Window to save time.
Using 2D graphics versus 3D (Spherical) Graphics
The Graphic Editor allows you to place graphics either within the the two-dimensional frame of the viewing window, or place them within a three dimensional space, as part of your 360 sphere.
Spherical (3D) graphics can are pinned to the 360 video sphere at a given horizontal and vertical rotation point and move with the video sphere.
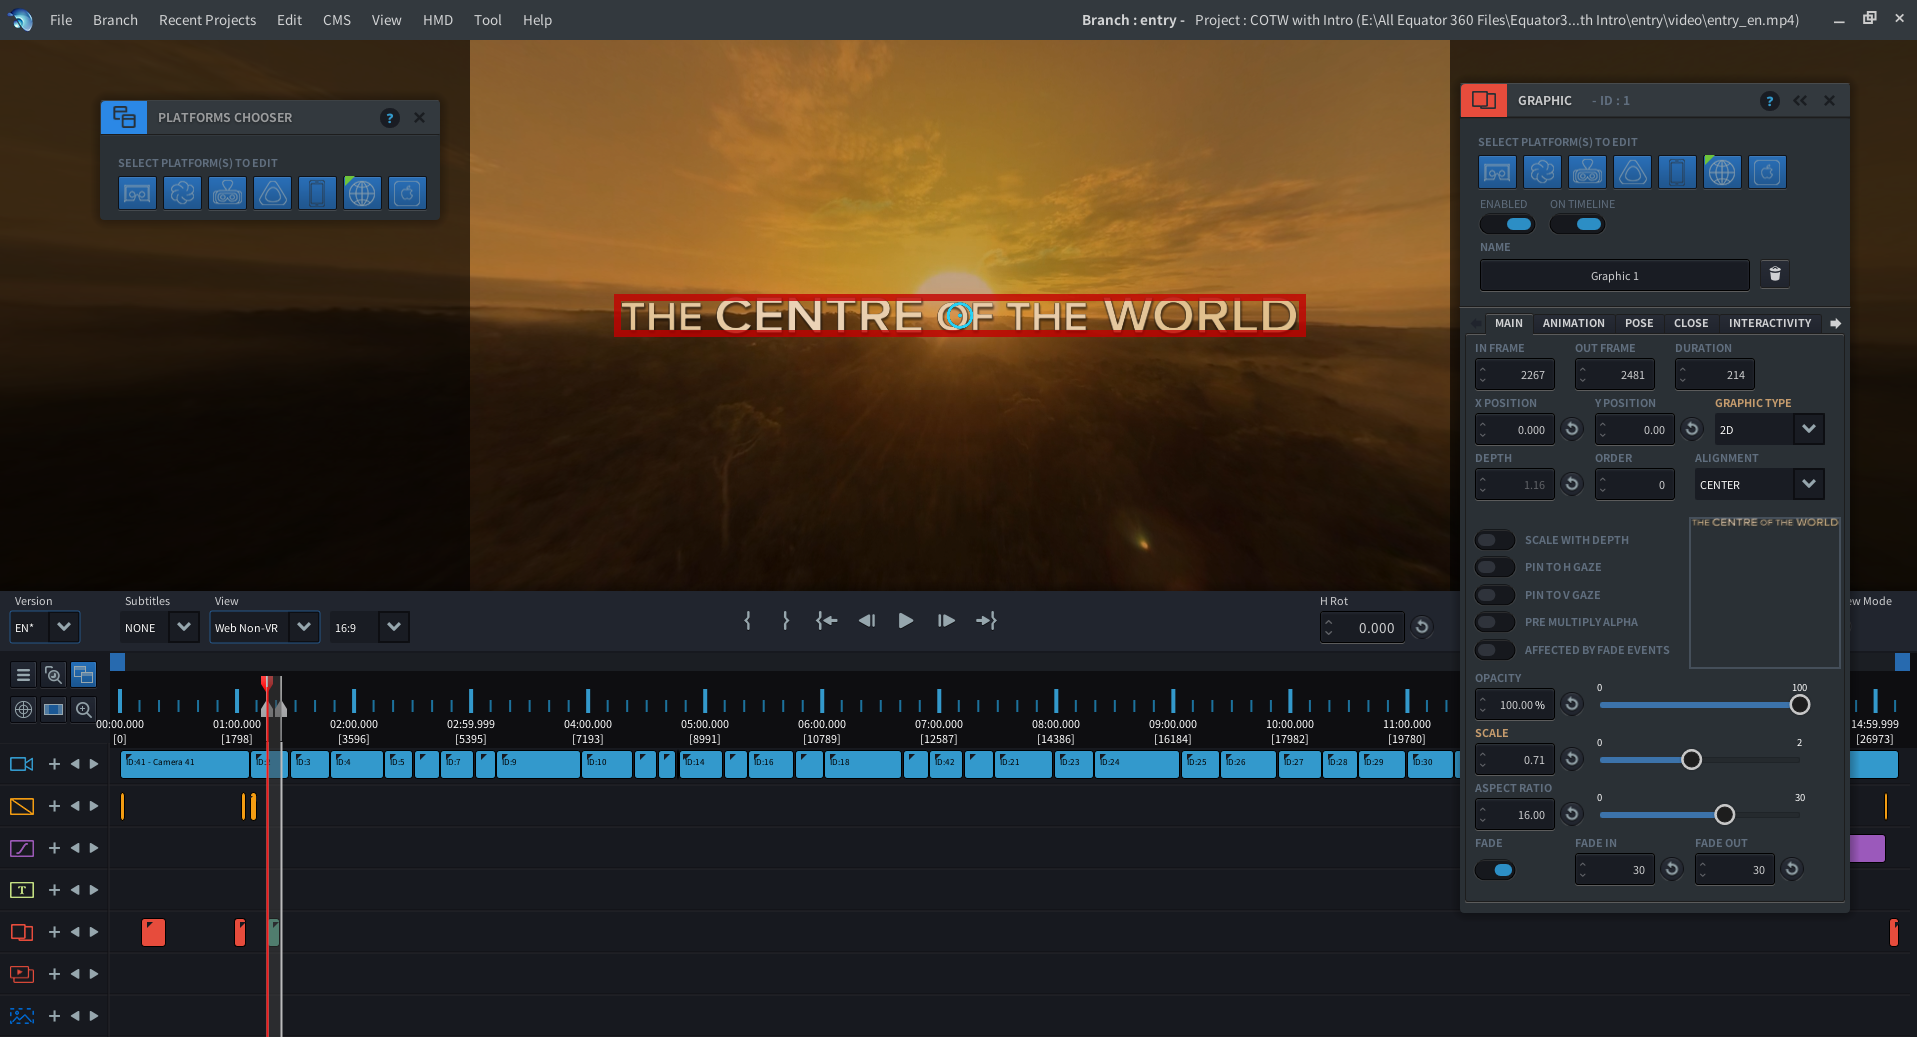
2D graphics will always appear statically in front of you and will not move along with the 360 video when looking around. They appear to be flat, not part of the 360 environment.
Take a look at the 2D title below. For a web browser, it is fine if it appears as a 2D image in the middle of the screen, and stays in the middle regardless of where you look.
In VR however, it feels more natural if the title is spherical, meaning it moves along with the 360 sphere. Here the Graphic Type is set to 3D:
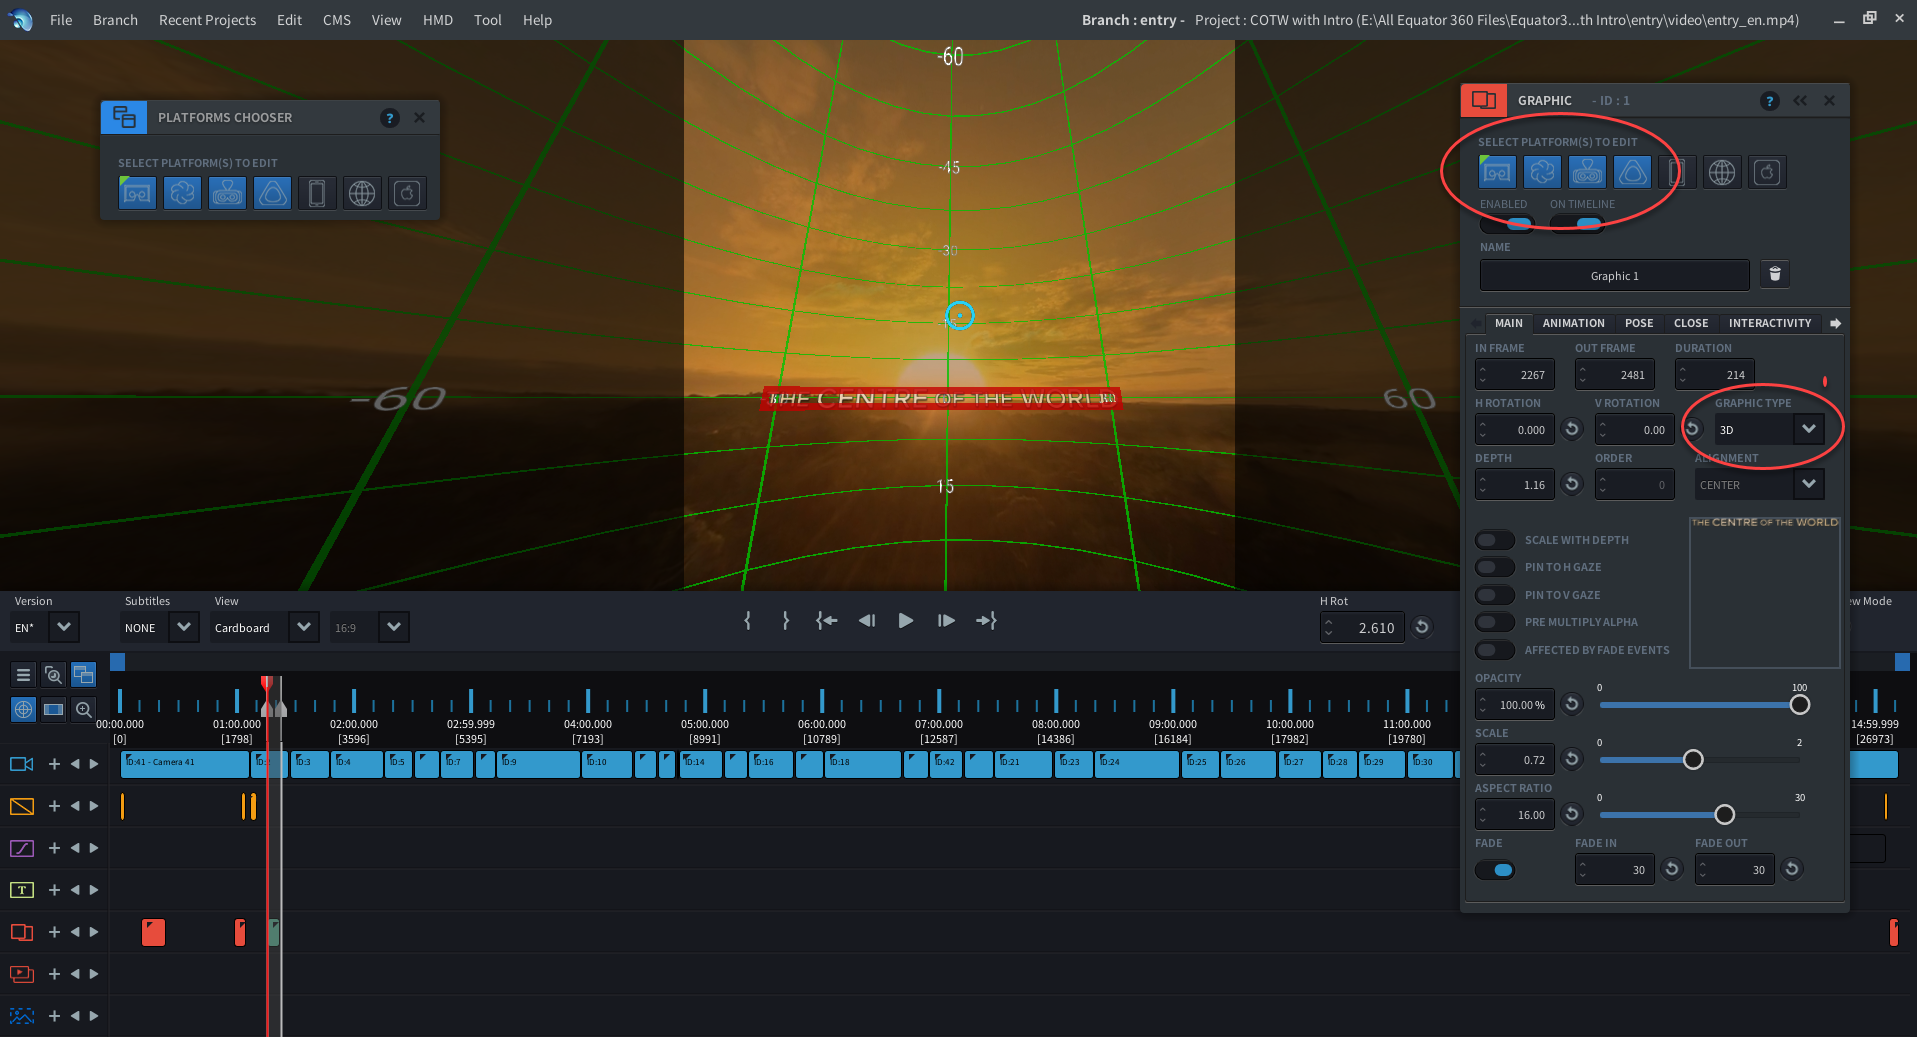
Since 2D-Type graphics do not work well in VR, we have suppressed the use of 2D mode in VR. In non-VR, both 3D and 2D Type can work well for graphics.
- Click on a Graphic Event on the Timeline
- The Graphic Editor will appear
- Click on

- A confirmation appears – select “”Delete”” to permanently delete that Event across all platforms, or “Cancel” to cancel the request
Once deleted, the GRAPHIC EVENT EDITOR will close and the Event will disappear from the Timeline.