Changing Projection Modes
Switching
Liquid Cinema allows you to combine different media in one timeline, such as 360 monoscopic, 360 3D, flat film monoscopic, and flat film stereoscopic. By default, the projection mode is set to 360 monoscopic. When you change projection mode within your timeline it is called ‘Switching’.
Your video sequence then would look something like this:

Each time in the video where media type switches, you will need to create a Camera Event and set the correct projection mode:
- Move the play head on the timeline to the frame where the projection change needs to take place. This is usually on a cut in the scene.
- Press I or click the In Point icon in the Control Bar to set the In Point of your Camera Event. The Out Point will automatically be set at the next Camera Event. If no other Camera Events are present in your timeline, that would be the end of the timeline.
- Click the
 icon next to the camera icon in the timeline to create a new Camera Event. The Event Editing Panel will now pop up.
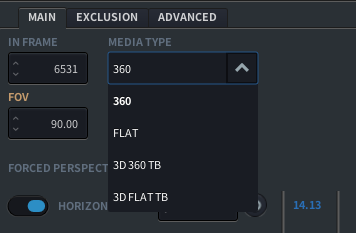
4. On the Main tab under MEDIA TYPE, select the correct projection mode by choosing from the pulldown menu:
360 monoscopic
Flat Film monoscopic (2D Film)
360 3D (Top Bottom)
Flat Stereoscopic (Top Bottom)
5. Liquid Cinema will now use the projection mode that you specified at this frame when playing back the video
Hard Cut vs. Cross Fade
Switching only works when there is a hard cut between two scenes. When editing your video, do not use cross-fades to combine different types of footage.
Switching
Switch projection modes at any point in the timeline. Go from 2D (flat film) to 360 and back again. Learn more about the creative possibilities of Switching.